Getting Started
Introduction & Setup
What is Jondob Interaction System?
Jondob Interaction System (JIS) is a data-driven event system for Godot. You place Interactables in your scene, give them Reactions to play, and branch on Conditions, all authored through a custom editor with little or no code.
If you've ever built a door that opens once, an NPC with changing dialogue, or a cutscene with a dozen moving parts, you know how quickly that turns into a tangle of one-off scripts and signal spaghetti. JIS replaces that with a small set of reusable building blocks.
Because everything is data, an interactable can be as simple as: “show a label when the player walks here” or as rich as a branching, stateful quest. Same node, different data.
Installation
- Get the addon from the marketplace (Godot 4.6 or newer)
- Enable the plugin: Project → Project Settings → Plugins, find Jondob Interaction System in the list, and switch it On.
Once enabled, JIS registers three new items you can create like any built-in node/resource:
| Item | Type | Description |
|---|---|---|
JISInteractable | Node | The interactable itself |
JISReactionListNode | Node | A standalone reaction list you can trigger from anywhere |
JISConditions | Resource | A shared bag of named conditions |
Pick your game mode (2D or 3D)
JIS has a small settings resource whose default_game_mode tells the editor whether you're building a 2D or 3D game. Set it, and JIS automatically attaches the matching trigger every time you add a new JISInteractable. Otherwise, you can manually add a trigger through the inspector per-interactable.
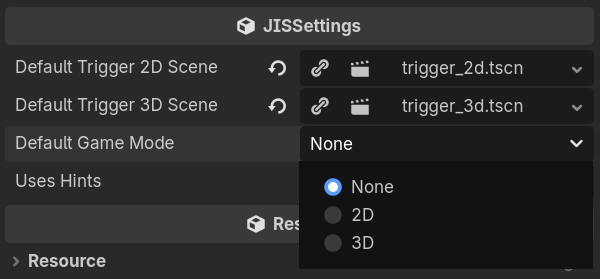
Explore the demos
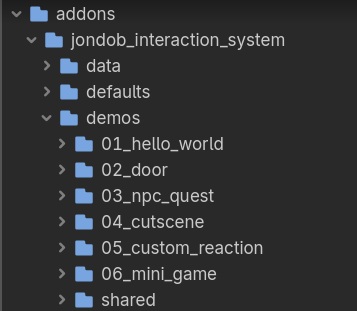
JIS ships with six complete demo scenes under addons/jondob_interaction_system/demos/. They're the fastest way to see each concept working. Open any of them and press Play.
Your First Interactable
By the end of this part you'll have a working interactable: the player walks into an area, and a line of text appears on screen.
Before you start
You need a scene with:
- A player: The demo's shared player under
demos/shared/is a good reference. - Some label (or any node with a text property) somewhere in the scene to display the message.
Add an interactable to the scene
- In the scene tree, click Add Child Node and search for
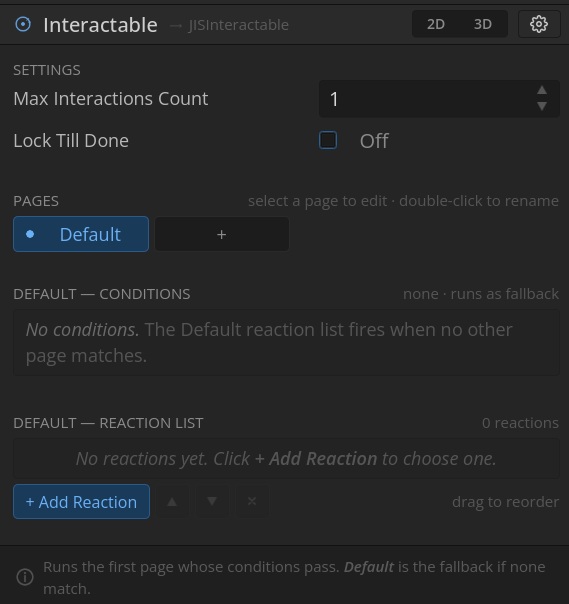
JISInteractable. Add it. - When you select the added node, the Inspector shows the interactable's settings (Reactions, Pages, Conditions, etc.). This is where you'll do all your authoring.
Set Up a Trigger
An interactable needs a Trigger child to know when to fire.
- If you set a game mode (2D/3D) in Part 1: a Trigger3D child was already added when you created the interactable. Skip to sizing it.
- If not: add the trigger yourself. With the interactable selected, find the 2D/3D buttons in the header, and click 3D.
Right-click the trigger node and select “Editable Children”. The trigger is a JISInteractableTrigger3D (an Area3D) and it comes with two children: a CollisionShape3D (the detection volume) and an Indicator (a visual prompt used later for button-press triggers; leave it hidden for now).
Size the collision shape:
- Select the
CollisionShape3Dunder your trigger. - In the Inspector, assign a shape (e.g. a
BoxShape3Dby default). - Size it to cover the area the player should walk into. (Don't overlap with anything else in the scene for now)
Check the trigger mode: select the Trigger3D and look at its mode property. Leave it on ON_ENTER (the default): the interactable fires the moment a body enters the area.
Add your first Reaction
Now tell the interactable what to do when it fires.
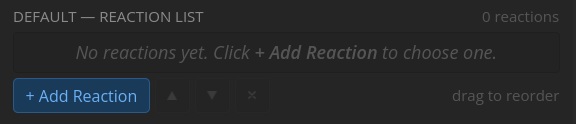
- Select the Interactable node. In its inspector panel, find the Reactions (default reaction list) section and click Add Reaction.
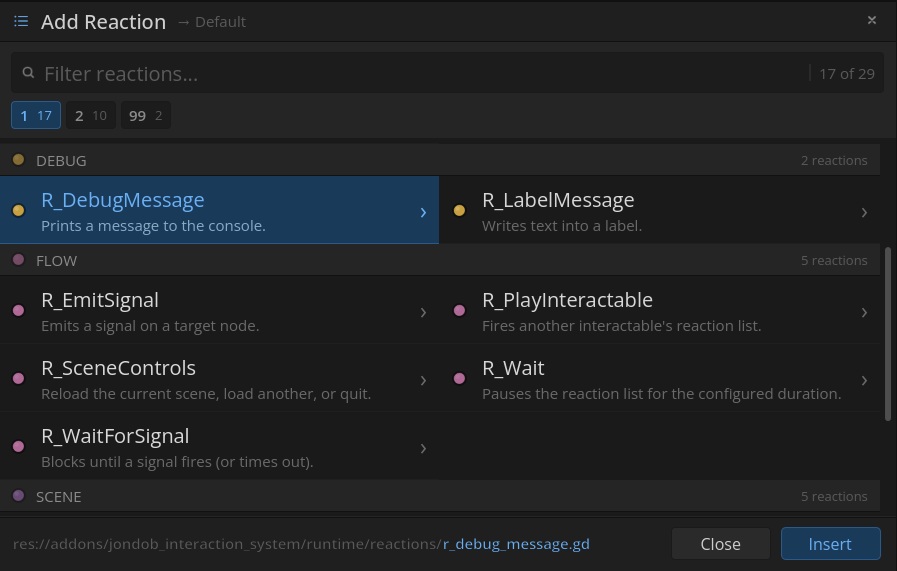
- The reaction picker opens. Select
R_LabelMessage(under the Debug category) & Insert. - An editor window pops up with a list of fields to fill in.
- Look at the parameters section:
| Field | Set it to |
|---|---|
| Target Label Path | The node to write text into (Assign or drag and drop it from your scene) |
| Text | The message to show, e.g. Hello, World! |
That's the whole reaction. When the interactable fires, R_LabelMessage writes your text into the target label and completes immediately.
Test your scene
Run the scene (F6, or Play the project).
Walk your player into the trigger's collision area. The moment the player's body enters, the interactable fires its reaction list, and your label switches to Hello, World!
Reactions
Reactions are the “what happens” of an interactable. Each one does a single job (play a sound, move a node, set a value, etc.) and you stack them into a list that runs top to bottom.
JIS ships a set of built-in reactions you can add without writing code.
Adding a new reaction
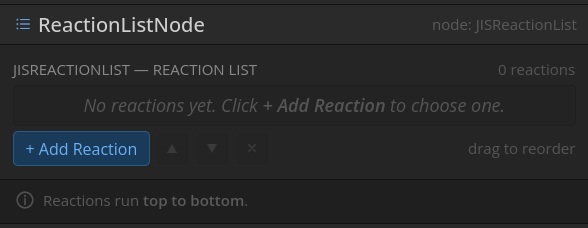
With a JISInteractable selected, navigate to the Reactions section of the JIS inspector panel and click Add Reaction.
The picker opens: reactions are grouped by category, each with a short description. Pick one, set it up and it's appended to the list.
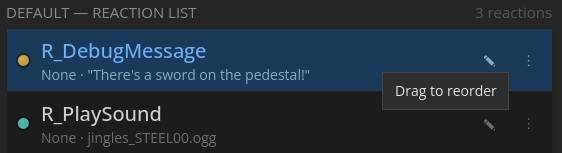
The reaction list runs top to bottom, so order of reaction insertion is important. You can still drag reactions in the inspector to reorder them:
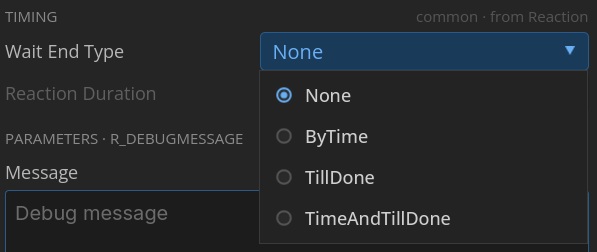
Wait modes: When the next reaction runs
A list plays top to bottom…but when does each reaction hand off to the next? That's the wait mode, set per reaction (e_wait_end_type, with a duration field where relevant):
| Mode | When the next reaction starts… |
|---|---|
None | Immediately / same frame. Use for instant actions (e.g. set a property, or print a message). |
ByTime | After a fixed duration. Use to hold a beat between steps. |
TillDone | When this reaction finishes its own work (Animation ends, Sound stops, Moving node arrives, etc.). |
TimeAndTillDone | When both are satisfied: the duration has elapsed and the reaction finished, whichever takes longer. |
Quick example: A two-reaction list:
R_PlayAnim(door opening), modeTillDoneR_PlaySound(creak), modeNone
With TillDone on reaction 1, the sound waits for the animation to finish. Switch reaction 1 to None and the sound fires instantly, overlapping the animation. Same two reactions, different timing, that's the wait mode doing its job.
R_Wait is always ByTime, and R_WaitForSignal is always TillDone. They exist to pause the list, so the mode is fixed.Triggers
A trigger is the “when” of an interactable (an Area2D/Area3D child that decides what makes it fire).
Trigger Modes
Every trigger has a mode property with three options:
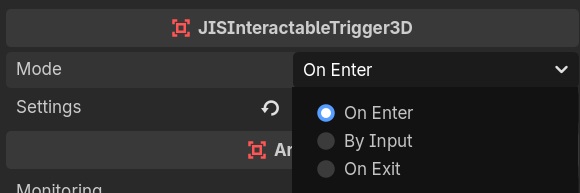
| Mode | Fires when… | Use for |
|---|---|---|
ON_ENTER | A valid body enters the area. (default) | Auto-events: step on a plate, enter a room, trip a cutscene. |
BY_INPUT | A body is inside and the player presses the interact button. | Deliberate interactions: talk to an NPC, open a chest, flip a switch. |
ON_EXIT | A valid body leaves the area. | Leave-behind events: close a door, end a zone, stop music. |
Setting up BY_INPUT
BY_INPUT needs one thing the other modes don't: a JISInteractionsManager attached to your player. When a body enters a BY_INPUT trigger, the trigger looks on that body for a manager by design: the manager travels with the player, so it also knows how to lock player movement (_lock_till_done).
To get running:
- Add a
JISInteractionsManageras a child of your player. It's an abstract class, so use a subclass. The demos ship a ready-made one,player_interactions_manager.gd. Drop it in or extend your own (Learn more in Extending The System). - Set the trigger's mode to
BY_INPUT. - Check the manager's
input_action: it defaults toui_accept(Space / Enter). Point it at your own input map action if you have a dedicated “interact” key.

Now, the interactable will only fire when the player stands in the trigger and presses the action.
Trigger Indicator
The default trigger scene includes an Indicator child (the on-screen prompt that appears while a BY_INPUT trigger is armed and hides when the body leaves). It's your “Press to interact” cue. Leave it hidden for ON_ENTER/ON_EXIT triggers; show and style it for BY_INPUT.
Locking the player during a sequence
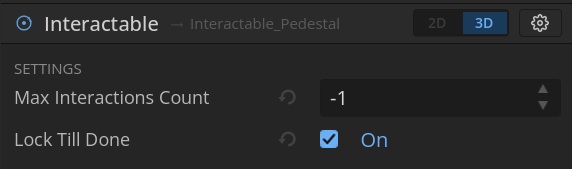
An interactable can hold the player still until its reactions finish. Set _lock_till_done on the interactable.
A few things worth knowing:
- It works for any trigger mode, not just
BY_INPUT. AnON_ENTERtrigger can freeze the player for a scripted moment, then hand control back. - Locking is ref-counted. If two interactions lock at once, the player unlocks only when both finish. No half-locked states.
- While locked,
BY_INPUTtriggers won't read input, so a playing cutscene can't be interrupted by mashing the interact key. - The actual lock behavior lives in the manager's subclass (that's why the manager is on the player). The demo manager implements it; your own would too.
Filtering who can trigger
By default any physics body sets a trigger off. To restrict it (say, only the player, not enemies or physics props), use allowed_groups.

- It lives on the trigger's settings resource (a
JISInteractableTriggerSettings). The trigger's settings property points at a shared default atdata/config/jis_interactable_trigger_settings.tres. - Add group names to
allowed_groups. Empty = anyone can trigger. Non-empty = the entering body must be in at least one of those groups. - Make sure your player node is actually in that group (Node → Groups tab).
Sharing vs. custom settings: many triggers can point at the same settings resource, so changing allowed_groups in one place updates all of them. Need a trigger with different rules? Create a new JISInteractableTriggerSettings resource and assign it to just that trigger.
Conditions & Pages
So far every interactable does the same thing every time. Conditions and pages are how it changes behavior based on some state (a door that's already open, an NPC mid-quest, a switch that's been flipped, etc.).
What conditions are
A condition is a named value you can read and change at runtime. Each has:
- a
condition_id: a string name likedoor_openorcogs_collected, - a type:
Bool,Int, orFloat, - a value.
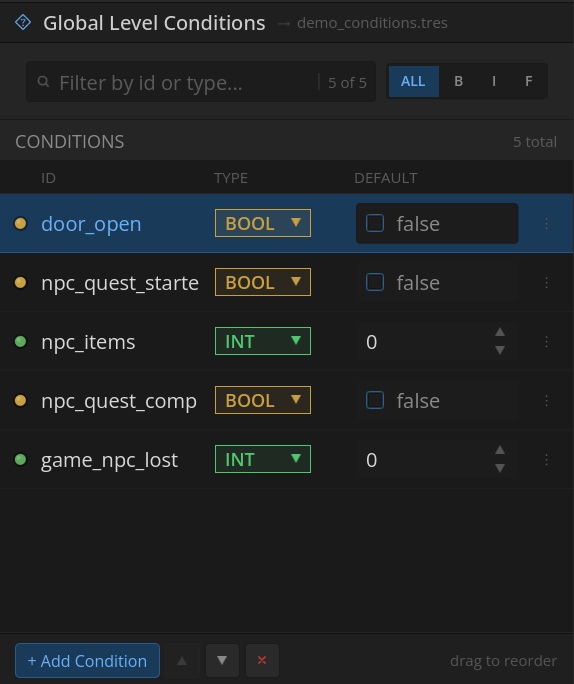
Conditions live in a JISConditions resource: a shared bag of named values, saved as a .tres file. Because it's a resource, many interactables can read and write the same conditions: an NPC sets quest_started = true, and a door across the map reads it. That shared file is how state travels between interactables without any node references.
Pages: picking a reaction list from state
A plain interactable has one default reaction list. Add pages and it can choose which list to play based on conditions.
Each page has three things:
- A set of condition checks (e.g.
door_open == false), a compare operator, and a value to compare against. - A decision operator:
AND(every check must pass) orOR(any check passes). - Its own reaction list: what plays if the page is chosen.
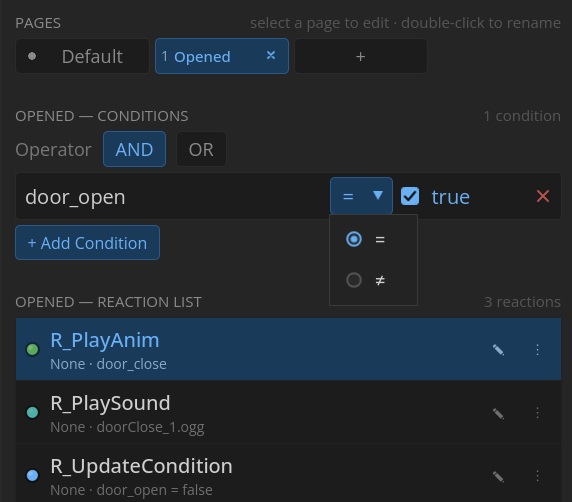
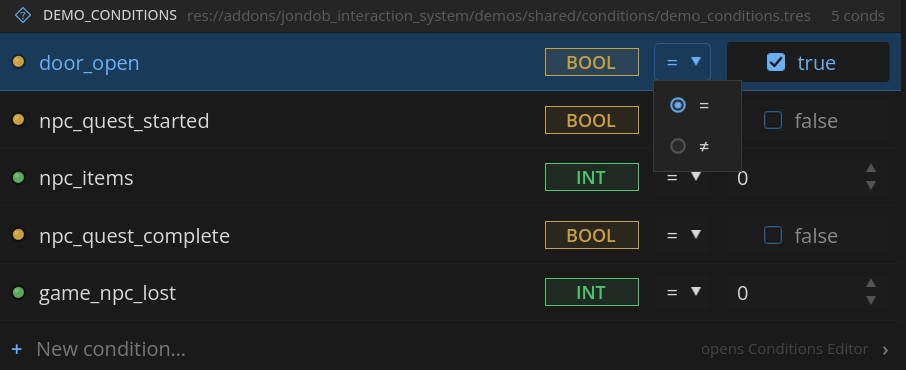
How the interactable chooses, on each interact():
- It evaluates pages top to bottom and runs the first page whose conditions are satisfied.
- If no page matches, it falls back to the default reaction list.
Two rules that follow from this:
- Order matters. Put the most specific / most restrictive page first, the general cases lower. First match wins (a broad page above a narrow one will shadow it).
- A page with no conditions is never satisfied (it evaluates to false), so it's skipped. The “else” statement belongs to the default reaction list, not an empty page.
A door is a classic two-page example:
| Page | Conditions | Reaction List |
|---|---|---|
| 1 | door_open == false | Play open animation, set door_open = true |
| 2 | door_open == true | Play close animation, set door_open = false |
Changing conditions from reactions
Pages read conditions; R_UpdateCondition writes them. That's the loop that makes state advance. Add it to a reaction list and set:
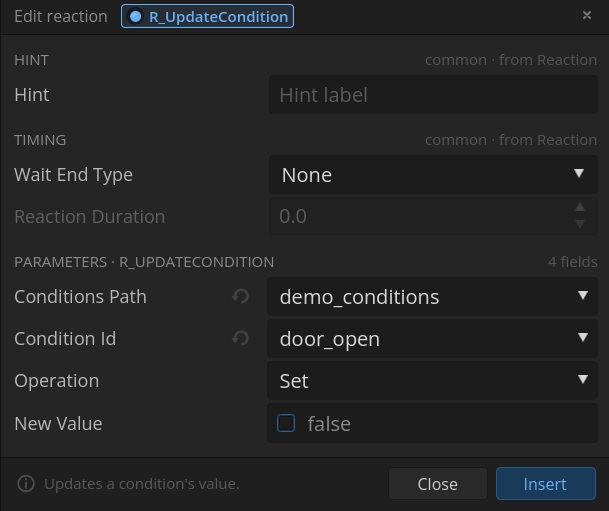
| Field | Meaning |
|---|---|
e_conditions_path | Which JISConditions resource to write to. |
e_condition_id | Which condition. |
e_operation | Set, Toggle (Bool only), Add, or Subtract (numeric only). |
e_new_value | The operand (ignored for Toggle). |
Extending The System
Everything so far used built-in pieces. When you hit something the built-ins don't cover, JIS allows the following extensions:
- The interactions manager (which you subclass once per project).
- Custom reactions (which you'll write whenever you need new behaviors).
Extending the interactions manager
JISInteractionsManager is abstract on purpose. JIS can't know how your game reads input or freezes your player, so it leaves these decisions to you and handles the rest (arming triggers, ref-counted locking, polling). You met it in the Triggers section as the thing BY_INPUT needs; here's how to write your own instead of borrowing the demo's.
Subclass it and implement three hooks:
class_name PlayerInteractionsManager
extends JISInteractionsManager

@export var player_path: NodePath = NodePath("..")
var _player: Node = null

func _ready() -> void:
	super._ready()
	_player = get_node_or_null(player_path)

# Freeze the player while an interaction holds a lock.
func _i_lock_player() -> void:
	if _player == null: return
	_player.set_physics_process(false)
	if _player is CharacterBody3D:
		var character := _player as CharacterBody3D
		character.velocity = Vector3.ZERO

# Hand control back.
func _i_unlock_player() -> void:
	if _player == null: return
	_player.set_physics_process(true)

# Tell JIS when the interact button was pressed this frame.
func _i_is_input_just_pressed(action: StringName) -> bool:
	return Input.is_action_just_pressed(action)
Points to keep in mind:
- Attach it as a child of your player, not loose in the scene.
input_actionis an inherited export (defaultui_accept). Set it to your interact action.- Optional: override
_i_is_locked()to add your own “player can't interact right now” conditions (in a menu, cutscene, dead). It's OR-ed with JIS's own lock count.
You write this once per project and reuse it everywhere.
Writing custom reactions
A reaction is a small class that does a specific job. To add one, drop a .gd file anywhere in your project (No registration needed; it appears in the picker automatically).
Anatomy
class_name R_Template
extends JISReaction


# =====================================================================
# 1. PARAMETERS  (fields prefixed with `e_`)
#
# Any `var` starting with `e_` becomes:
#   • a row in the reaction editor (with a widget matching its type)
#   • a serialized entry in the interactable's reaction list
#
# Don't redeclare these, JISReaction already provides them:
#   e_wait_end_type   : None / ByTime / TillDone / TimeAndTillDone
#   e_reaction_duration : float (seconds, used by ByTime modes)
# =====================================================================
- A reaction script must extend
JISReaction. - Fields are prefixed with
e_(or_e_). Any such var becomes an editable row in the reaction editor. Everything else is private runtime state: not shown, not saved. @exportannotations are honored for richer widgets: e.g.@export_range/@export_enum/@export_multiline/@export_node_path.- Don't re-declare the inherited fields
e_wait_end_typeande_reaction_duration; you already get them from the base. get_editor_info()controls how the reaction is displayed in the picker (name, description, category, icon, a live preview string for the list row). Return{}for defaults.
func get_editor_info() -> Dictionary:
	return {
		"name": "R_Template",
		"description": "A template (duplicate me and edit).",
		"category": "DEMO",
		"page": 99,
		"icon": JISAssets.ICON_BULLET_BLUE,
		"preview": "(unset)",
		# "placeholders": { "e_some_text": "Type something..." }
		# "multiline_fields": [ "e_some_text" ],
	}
Lifecycle
Three methods run in order. Override only what you need:
| Method | When | Returns |
|---|---|---|
_i_start_reaction() | Once, on start. Do one-shot work, resolve nodes. | ReactionRes.OK, or an error to crash the reaction. |
_i_update_reaction(delta) | Every frame while running (only if it didn't finish in start). | OK / error. |
_i_finish_reaction() | Once, when it fully completes. Restore/clean up. | — |
Two helpers tie it together:
get_node_from_root(path): resolve a NodePath field. Paths are relative to the interactable host, not the reaction._stop_behavior(): call it when your reaction's work is done. It doesn't end the reaction by itself as the reaction's wait mode decides that. It only matters forTillDoneandTimeAndTillDone(the modes that actually wait on your signal). Sete_wait_end_typein code, or leave it to the author.
Example (R_ColorCycle)
A reaction that cycles a mesh through the color wheel for a few seconds, then puts it back exactly as it was:
class_name R_ColorCycle
extends JISReaction

## MeshInstance3D to recolor.
@export var e_target_path: NodePath = NodePath("")
## Full color loops per second.
@export_range(0.1, 5.0, 0.1) var e_speed: float = 1.0

var _target: MeshInstance3D = null
var _prev_override: Material = null      # snapshot, so we restore cleanly
var _material: StandardMaterial3D = null
var _hue: float = 0.0

func _i_start_reaction() -> ReactionRes:
	# Run for e_reaction_duration seconds; the base class ends us on the timer.
	e_wait_end_type = WaitEndType.ByTime

	_target = get_node_from_root(e_target_path) as MeshInstance3D
	if _target == null:
		return ReactionRes.ERR_NULL # can't find target, crash cleanly

	_prev_override = _target.material_override
	_material = StandardMaterial3D.new()
	_target.material_override = _material
	return ReactionRes.OK

func _i_update_reaction(delta: float) -> ReactionRes:
	_hue = fmod(_hue + e_speed * delta, 1.0)
	_material.albedo_color = Color.from_hsv(_hue, 0.8, 1.0)
	return ReactionRes.OK

func _i_finish_reaction() -> void:
	if is_instance_valid(_target):
		_target.material_override = _prev_override   # exactly as we found it
	_target = null
	_material = null

func get_editor_info() -> Dictionary:
	return {
		"name": "R_ColorCycle",
		"description": "Cycles a mesh through the color wheel for a while.",
		"category": "EFFECTS",
		"icon": JISAssets.ICON_BULLET_BLUE,
		"preview": "cycle %s" % e_target_path,
	}
Quick Reference
A summary of the most important calls you can make from your own scripts.
Interactable calls
All methods below are on any JISInteractable node (or anything extending JISInteractableAbs).
Methods
| Method | Description |
|---|---|
interact() | Run the interactable: the first page whose conditions pass wins, otherwise the default reaction list plays. Returns false if it is already running, not allowed, or has nothing to play. |
is_interacting() | Whether a reaction list is currently running on this interactable. |
can_interact() | Whether a fresh interact() would be allowed (the max-interactions limit is not reached). |
get_max_interactions_count() | The configured interaction limit. Zero or negative means unlimited. |
get_lock_till_done() | Whether this interactable requests a player lock while it runs. |
get_ser_data() / set_ser_data(data) | Serialize or restore the full setup (settings, pages, reaction lists) as a Dictionary. |
JISInteractable.create_new(ser_data) | Static — build a new interactable node from serialized data at runtime. |
Signals
| Signal | Description |
|---|---|
on_started(interactable) | Emitted when an interaction begins. |
on_finished(interactable) | Emitted when the running reaction list completes. |
Condition calls
JISConditions is the resource that owns runtime condition state. Get the shared instance with the static get_runtime(), then read or write conditions by id.
JISConditions (the store)
| Method | Description |
|---|---|
JISConditions.get_runtime(path) | Static — load (and cache) the conditions resource at path. Everyone who asks for the same path shares one runtime instance. |
get_condition(condition_id) | A clone of one condition — a read-only snapshot of its current value. |
get_conditions() | Clones of every condition in the store. |
update_condition(condition_id, value) | Overwrite a condition's value by id. |
apply_op(condition_id, op, value) | Apply Set / Toggle / Add / Subtract to a condition by id. |
get_current_state_ser_data() | Snapshot all current condition values as a Dictionary (useful for save games). |
JISCondition (a value)
| Method | Description |
|---|---|
get_bool_value() | The value of a Bool condition. |
get_num_value() | The numeric value, whether the condition is Int or Float. |
evaluate(target, compare_operator) | Compare this condition against another with Equal / NotEqual / Greater / Less / GreaterOrEqual / LessOrEqual. |
Manager & trigger calls
The interactions manager lives on your player (you subclass it once — see part 6). Trigger behaviors expose signals you can use to drive interaction prompts.
JISInteractionsManager
| Method / Property | Description |
|---|---|
input_action | Exported StringName — the input action polled while a BY_INPUT trigger is waiting for input (default ui_accept). |
is_locked_total() | Whether the player is currently locked — by JIS's ref-counted lock or by your own _i_is_locked() override. |
ext_lock_player(interactable) | Raise a player lock manually. Locks are ref-counted: three locks need three unlocks. |
ext_unlock_player(interactable) | Release one previously raised lock. |
enable_input_listening(trigger) | Arm a trigger for input polling. Triggers call this themselves in BY_INPUT mode — you rarely need it directly. |
disable_input_listening(trigger) | Disarm a trigger from input polling. |
JISInteractableTriggerBehavior
| Signal / Property | Description |
|---|---|
on_started_waiting_for_input(behavior) | Signal — a valid body entered a BY_INPUT trigger; input is ready. Show your “press E” prompt here. |
on_stopped_waiting_for_input(behavior) | Signal — the body left before interacting. Hide the prompt. |
on_input_consumed(behavior) | Signal — the trigger just ran its interactable via input. |
interactable | The JISInteractableAbs this trigger runs (resolved from its ancestors at setup). |
mode | ON_ENTER / BY_INPUT / ON_EXIT. |
Standalone reaction lists
JISReactionListNode plays a reaction list without an interactable around it — no trigger, no pages, no interaction count. Useful for cutscene-ish sequences you start from code.
| Method | Description |
|---|---|
play_collection() | Start playing the node's reaction list (warns if it is already playing). |
is_playing() | Whether the list is currently running. |
get_ser_data() / set_ser_data(data) | Serialize or replace the node's reaction list. |
JISReactionListNode.create_node(parent, name, ser_data) | Static — create and attach a reaction list node from serialized data. |
Inspecting an interactable
JISInteractableExtensions offers static, read-only accessors over an interactable's page and reaction data:
| Method | Description |
|---|---|
get_pages_count(target) | How many pages the interactable has. |
get_page_name(target, page_index) | A page's name (empty string if out of range). |
get_page_operator(target, page_index) | How the page combines its conditions: AND (all must pass) or OR (any). |
get_page_conditions(target, page_index) | The conditions attached to a page. |
get_reactions(target, page_index) | The reactions on a page. A negative index returns the default reaction list. |